You’ve got a bad smell in your car, and no matter what you do, it won’t go away. That usually means you haven’t found the source of the unpleasant smell.
Unfortunately, there’s only so much you can do other than sprinkle baking soda and hope for the best. Removing stubborn odors is a problem best left to professionals.
A skilled professional detailer has all the right equipment, chemicals, and the most effective way to clean any vehicle properly. And when it comes to ozone odor removal in cars, the best way to do that is to use an ozone generator.
In this article, we will learn about ozone odor removal in cars.
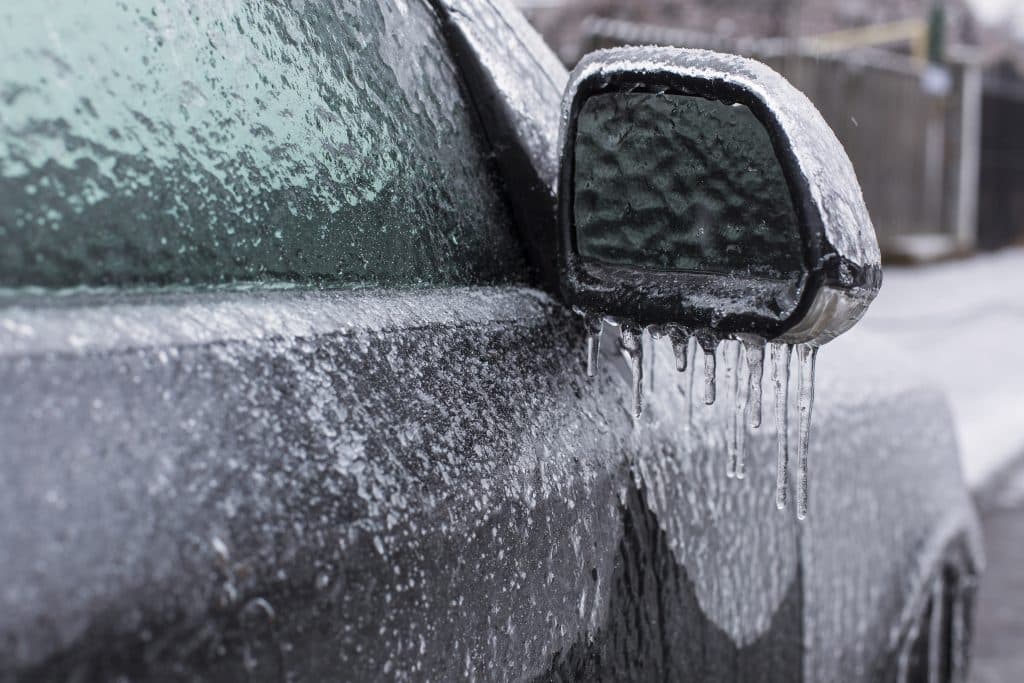
Smelly Cars Can Be Awful. Clean it with Ozone Odor Removal. Photo Credit: AdobeStock by metamorworks
But even before we start with ozone treatments, you must find the source of the smell. The easiest way to do this is to wash and detail your car’s interior. Check out the information below for more info on locating the source of stubborn odors.
How Do Odors Get Into Cars?
Odors get into cars primarily through two sources: water and food.
You know how it goes; you’re driving along, and suddenly the car smells musty, or like someone just opened a can of paint. That’s because water has gotten into the car and created a perfect environment for mold to grow. Not only does mold smell terrible, but it can also cause various health problems.
Food is another common odor-causing culprit in cars. All those french fries, hamburgers, and tacos that we love to eat while on the go can create some pretty powerful smells. And like water, food can also lead to the growth of mold.
It’s essential to find and eliminate the source of car odors if you want the ozone treatment to be effective and permanent.
After cleaning the vehicle’s interior, an ozone machine is placed inside the car and fills it with the gas ozone.
Locate the Source of Stubborn Odors
It would disgust you if you saw all the things that create a bad smell for a professional detailer to locate.
Body odor from sweat-soaked car seats is one that still gives me nightmares.
Mold and mildew odors inside vents are a frequent problem that is unhealthy to breathe.
Spilled food and grease saturate upholstery fibers and create a bacteria breeding ground.
Cigarette smoke might seem bad, but cigar smoke has it beat for the worst of the odorous compounds.
Don’t forget secondhand tobacco smoke from riders in the car. Sometimes it’s not the driver.
Two words – old milk.
One word – vomit.
And you might think these would be unusual situations, but no young padawan, it is not. Ask any detailer about the worst car they ever cleaned. Then sit down as they regale you with a long story about that one minivan.
It’s always a minivan.
Babies are awesome but very messy. Make sure you are cleaning your kid’s car seat often.
And just because minivans are often in the worst condition, it’s not always kids to blame. I’ve seen many cars owned by salespeople that looked like they let a trash panda live out of it for several months. Ketchup-covered french fries, mashed between the front driver’s seat and the console, seem to be the choice of most salespeople in cars. It’s gross but fixable.
Find the Source of the Odor and Remove it Before Ozone
You can do it yourself or get it done by a professional. Either way, it must be done. Getting a full interior detail is usually the only way you will find the source of the smell. Nearly every smell in a car is caused by various organic sources such as rotten food or body fluids from humans or animals. It could be baby or dog vomit in the backseat. Or the ever-popular french fries in between the center console and driver’s seat. And if you’ve got small children, don’t overlook possible spilled milk on the baby’s car seat. There are simply too many possible sources to list here. We have an extensive list of odor-causing sources and how to remove stains and smells from car seats in our article on How to Clean Cars Seats with Household Products.
Defeating Bad Odors with an Ozone Generator
Professional detailers always boast about their cleaning process. Getting horrible stains out of a car is a big deal and a valuable skill.
Great car detailers also have a secret weapon in defeating foul odors. It’s called the ozone generator. And when combined with interior detailing, odors and smells have no chance.
I have used many deodorizing methods in two decades of cleaning and detailing cars, boats, and planes. But I have never run into bad smells that were impervious to ozone generators on all interior areas of a vehicle.
So let’s learn more about the magic of oxygen molecules and how they interact to make ozone odor removal in cars an excellent service to offer for killing car odors.
What is Ozone?
Ozone (O3) is a gas molecule composed of three oxygen atoms. Also called trioxygen, it is unstable and highly reactive. Ozone is created naturally by the sun’s ultraviolet rays and by lightning.
What Does Ozone Smell Like?
Did you ever hear someone say that they are able to “smell” rain or an oncoming Summer storm? There is some truth to that. They aren’t smelling the rain, per se, it’s actually something called Petrichor, which was named back in 1964 by Australian scientists trying to describe the distinct scent of rain in the air. They found that right before a rainfall, the earth releases a mix of several naturally occurring elements, plant oils, and ozone. This clean, fresh smell will often also remind people of a faint chlorine odor like a nearby pool.
Why is Ozone Used to Remove Odors?
Use ozone odor removal in cars, boats, planes, and anything else that can become smelly over time. It is simply the most effective way to kill an odor.
When ozone comes into contact with odor molecules, it binds to them and destroys the molecules. The ozone molecule is small enough to fit between odor molecules and destroy them, thus eliminating the odor. The smell is gone for good as an ozone treatment does not leave a nasty smelling residue like some irritating chemicals found in commercial cleaners on the market.
When you use an ozone treatment, it is so much more effective than air fresheners that only temporarily mask the problem.
And ozone gas permeates throughout available space. That makes it an excellent choice for getting rid of smells in hard-to-reach areas such as inside a car or boat.
How Does an Ozone Generator Work?
A commercial ozone generator is a relatively simple device consisting of specific wavelength UV light (ultraviolet) lamp tuned to 185nm wavelength, a fan to move air through the machine, a transformer to power it, and a box to hold it all together.
So how does an ozone generator work? It essentially creates negatively charged ions. Those ions attach to the larger particles of the pollutants and odors. Then the generator blower sends the particles through its electrostatic filter to be cleaned out later.
A more detailed lesson on the science behind how an ozone generator works can be found on this excellent web page from Oxidation Technologies, titled “Ozone production from UV.”
The ozone treatment process is somewhat time-consuming since ozone generators are left inside the vehicle from 30 minutes to 120 minutes. It is also crucial to follow safety procedures like never allowing people or animals inside vehicles when using an ozone generator. And always air out the car for at least 40 minutes after ozone treatment.
An ozone generator with a timer is a better choice in case you forget to remove the machine. Photo Credit: Adobe Stock: Patricia
How Much Do Ozone Generators Cost?
An average-sized Ozone Generator will produce between 5,000 mg/h and 10,000 mg/h and cost anywhere from $100 to $500 or more. You can find cheaper ozone generators, but they won’t necessarily hold up under the stress and frequent use of an auto detail shop. I found several units online that I would consider durable and reasonably priced in the $70 to $199 range. Just be sure to check that the unit you buy doesn’t have a “not for commercial use” disclaimer.
The great thing about ozone generator units is that they work to remove hard to eliminate smells like smoke and mildew, so the upsell is easy. And this service can be a long-term profit source for any detail shop that manages it appropriately.
Using Ozone Generators to Disinfect Against Covid-19 Viruses
Ozone is a very effective disinfectant in buildings, vehicles, and anywhere with surfaces to protect. In a technical information paper titled, “Use of Ozone Generators Against Covid-19”, the US Army Public Health Center found that using 2.5 parts of ozone per million parts of air (parts per million (ppm)) to 5 ppm will effectively disinfect against covid-19 viruses and limit damage to surfaces.
Another report by the National Institutes of Health (NIH) in December 2020 listed multiple case studies showing the effective use of ozone gas as a disinfectant and its anti-viral properties. One such study titled “Ozone gas as a virus decontaminating agent” discussed the use of peak ozone gas concentration of 20-25 ppm for a very short time resulted in 99% of viruses being inactivated. In fact, according to the study, “there was not even a single virus which was resistant to ozone.” That is out of 12 viruses they tested.
When you offer ozone odor removal in cars as a service, adding a few items to advertising mentioning how ozone machines can be used as an effective disinfectant could potentially be a significant opportunity for additional profit centers. All your potential customers are worried about viruses, so being able to disinfect customer cars against Covid-19 viruses is a great selling point.
How Much Does Ozone Odor Removal in Cars Cost?
When it comes to an ozone car treatment price, you can usually expect to add $150 to $300 or more onto your standard full detail charge. We call this the Ozone Machine Upsell. Offering ozone odor eliminator services for cars will become a significant profit center for any auto detailing business. You can offer a guarantee to make it an easier sell. Our shops told customers that if we didn’t eliminate the foul smell, they don’t pay the additional ozone car treatment price. That makes it easy to sell.
Ad Copy for Ozone Odor Eliminator for Cars Service
Here’s the copy we use on flyers and web pages when advertising the ozone generators for odor removal services. It spells out precisely what it does for your customers:
Our ozone odor eliminator for cars service is the most advanced in this region. This service is an add-on when combined with an interior detail or a full premium detail. We start by removing any hidden garbage or possible sources of the smell. Then we vacuum the interior carpet and upholstery, followed by steam cleaning the car interior. The Ozone Generator Machine is placed in your vehicle for 30 to 120 minutes, depending on the severity of the smell. This process will neutralize bacteria, mold, mildew, pet odors, smoke, and many viruses, including influenza and Covid-19, on exposed surfaces within your vehicle. The ozone gas fills your car passenger compartment, trunk, air ducts, heater, and air conditioner with concentrated odor-killing ozone gas. This service adds one to two hours to any detailing package.
Bad Odors Make Motivated Customers
Vehicle odors make very motivated customers. Ozone treatments will give you an edge in bringing back the new car smell your customers want.
And they will understand that you invested in ozone machines that will remove everything from pet odors to bad car smells in about half an hour. So it’s going to cost them some money for ozone treatments.
By guaranteeing your work, you give your customers peace of mind that they aren’t getting baited into something they don’t need.
Ozone Odor Removal in Cars
Your focus should be on the technology, required equipment, and effectiveness to sell services for ozone odor removal in cars. The alternative is for the customer to try a DIY baking soda and activated charcoal blend and spend a few hours scrubbing their car interior.
Just make sure they understand that ozone treatments are one of the only reliable methods for eliminating hard-to-remove odors like smoke, bacteria, mold, and mildew in car upholstery and carpets.
Offering ozone odor removal in-car services at your shop will be an excellent value-added service that your customers will appreciate.
How to Clean Car Seats with Household Products and Not Be Disgusting
Clean car seats are something everyone wants. Doing the work to maintain those clean seats is another story altogether.
Think about all the places you go. Everywhere you sit. Some of it stays with you. The park bench with the chewing gum and bird poop? That’s on your car seat now. The doctor’s waiting room seat with the snot from a sneezing kid before you sat down? Yep, you took some of that home in your car too. So let’s talk about how to clean car seats with household products. No special cleaning solutions or chemicals. Just the stuff you probably already have in your house.
Car Seats are Disgusting, Gross, and Smelly
Dirt, germs, and grime are everywhere. And you sit in it constantly. Anytime you ride the bus or take the subway to work, you are sitting where a thousand people have sat before you.
It’s the same situation with restaurants, the waiting room at the doctors, and the ice cream and gum on the park bench.
And do we even want to talk about that stained area on your back seat? It might have been a great time, but you probably don’t want that permanent reminder of your back seat adventures. Or maybe you do. I’m not judging.
Dirt and bacteria accumulate over time. Left unchecked it becomes a petri dish of 52 flavors of gross.
I could go on and on, but I think you get my point. Your car seats are disgusting, gross, and smelly.
How to Clean Car Seats with Household Products
When I was a kid I would come home from school and Mom would make me put on my play clothes to go outside. She didn’t want me to ruin my school clothes. And she washed everything before I wore them again.
Indirectly, Mom was also doing her part to stop the germs and bacteria that hitched a ride home with me from taking up residence inside our house.
Obviously, you can’t keep changing your clothes each time you get into your car. But you can have a plan in place to regularly clean your car. As long as you include the interior. And, of course, your seats.
To make this easier I’m going to share with you the easy-to-do tips and tricks I’ve learned over the years about cleaning car seats with household products. The everyday stuff you find around your house. It’s not as difficult or expensive as you think to keep everything clean.
How Often Should I Wash My Car Seat?
This is probably going to make you cringe. You should be cleaning and disinfecting your car seats once a week. If you want to argue that point, you haven’t really considered all the things you sit in every day that get transferred to the seats in your car.
The majority of car owners clean their car twice a month at a minimum. But running your car through a car wash only makes it look shiny outside. The inside is still a teeming cesspool of accumulated bacteria and grime mixed with pet hair, grease stains, and who knows what else. Well actually, we know, it’s listed below.
Maybe it’s time to clean up those french fries that fell between the driver’s seat and the center console two months ago.
All of us have lives. So washing your seats weekly isn’t feasible for many people. But how about cleaning and vacuuming your car once a week? That sounds more reasonable. And keep in mind that the entire premise of this article is how to clean your car seats with household products, not necessarily items that you need to go to the store to buy. So the focus is on making this easy, convenient, and an activity that can become a routine.
How Often Should I Vacuum My Car?
Since you’re already washing the outside of your car twice a month, how difficult is it for you to add an interior vacuum to your normal cleaning regimen? It’s not deep cleaning, but a vacuum will remove most of the dust and dirt from inside the car. Then just lightly spray some Lysol on all the seat surfaces to keep bacteria and smells under control.
If you start a twice a month interior cleaning like this, eventually you can add a monthly or every other month deep cleaning of the full interior. Or at least try to steam clean your seats once a month.
A clean car interior starts with vacuuming car seats as often as washing the exterior. Photo Credit: AdobeStock.
What is the Best Way to Vacuum My Car?
Most people would not think there is a science to properly vacuuming a car, but there is. I’ll give the process and some easy-to-do tips that will make vacuuming your car not so tedious and boring.
The Car Vacuum Process:
Are you using a public car wash vacuum? Then use a cleaning wipe to clean the end of the vacuum nozzle before you start. You have no idea where that thing has been or what it has cleaned before you.
Never start vacuuming your car floors before your seats. Anything that is on the floors will be transferred to the seats by the end of the vacuum nozzle. It’s better to just start with the seats. and then move down to the floors.
Start with the front seats and move to the back.
Make overlapping, side-to-side strokes on the seats.
After the first vacuum, beat the seats several times with your hand or something flat like a tennis racket. This will dislodge any trapped dust or dirt in the pores of the cloth or the foam inside the seat.
Then vacuum a second time to clean any additional dust and dirt from beating the seats.
After the seats are done, vacuum the floor by moving the vacuum cleaner in a straight line.
Finally, go around the edges of the car and clean in between the seats and door panels.
Don’t forget to clean under the seats!
Easy To Do Tips for Vacuuming Your Car
Use a soft-bristled attachment on your vacuum cleaner so you don’t damage the upholstery or scratch the leather. I use several different types, but this brush attachment is my go-to for most types of car vacuuming.
If your car has floor mats, take them out and vacuum them separately.
If your car has a lot of crevices and tight spaces (like most cars), use a can of compressed air to help clean them out. I use a detailer vacuum attachment kit to get into every small nook and corner in my car.
Vacuum the trunk, too!
Run the vacuum nozzle over the dash and any places on the car with crevices, like the center console.
Now that you know how to vacuum your car properly, let’s talk about how to keep your car clean by washing different types of seats.
Child Car Seats are Bacteria Breeding Grounds
The child car seat is a fantastic safety invention that also happens to be a catch-all for everything related to your child. Anything they eat and drink is on their car seat. And unfortunately with kids, what goes in, often comes out unexpectedly. Sometimes even explosively. And always at the worst possible time.
Your kid’s car safety seat takes the brunt of all that. It’s usually dirty, gross, and disgusting.
Parents always fascinate me. Maybe it’s because I am a parent, but seeing how other Moms and Dads deal with their kids is interesting. They watch everything their kids eat. They research every toy. They make sure to clean and sanitize everything that touches their little bundle of joy. Then they take their spotless, squeaky clean child and strap them into a plastic bacteria breeding experiment that hasn’t been cleaned since their kid came home from the hospital – two years ago.
Clean Your Child Car Seat
Look, I get it. I’ve got three kids and I’m always tired. It comes with the territory as a parent. If it sounds like I’m being judgmental, I’m not. I’m simply adding some dramatic flair to a subject to drive home my point.
If I accomplish anything with this article, I would be happy if it convinced you to set a reminder to clean your child’s safety seat a few times a month. Even once a month would make a huge difference.
Child Car Seat Weekly Cleaning Tip
Once a week remove your child’s car seat padding and toss it in the washer on hot. It’s not difficult to do, all child safety seat manufacturers make this part easy. Then lightly spray all the plastic parts of the seat with a 50/50 warm water and vinegar mixture. Let it sit for five minutes and wipe it down with a cloth or microfiber towel.
Occasionally you can change it up and clean it with a baking soda solution and hot water.
How to Clean a Child Car Seat After Vacation
When you come home from vacation, your kid’s car safety seat will be even worse than normal. Pull the padding and wash it as I mentioned above. Then drive to a do-it-yourself car wash and use the pressure washer wand to power wash the crap out of the plastic on the seat. If you have a pressure washer at home that will also work. After you’re done, simply put it out in the sun to dry.
Sunlight is a Natural Disinfectant
Sunlight is a natural disinfectant that gives you both heat and UV (ultraviolet) radiation. The combination of both will do a great job of disinfecting and drying the seat. Removing excess moisture and giving the seat time to dry in the sun will also inhibit mold growth.
There are a variety of ways to clean a seat. So let’s first talk about the types of seating materials that you will find in your vehicle.
Types of Seat Materials Used in Cars
When you sit in a car, your rear will generally enjoy one of three types of material:
Fabric or Cloth Upholstery seats
Leather seats
Vinyl seats
Steam cleaning your car seats kills bacteria and many other germs picked up during your day. Photo Credits: AdobeStock
How to Clean Cloth Car Seats
This is the most common type of car seat. It’s usually made of a polyester and cotton blend. The fabric is treated with a stain-resistant coating, but it’s not invincible.
You can clean cloth car seats with household products that range from spray cleaners to mixing your own solutions. The thing to watch is the pH level of the ingredients. I would recommend avoiding any cleaner that is ammonia-based. Ammonia can strip the coating of the fabric and leave it susceptible to staining in the future.
A good general-purpose cleaner to use on cloth seats is Formula 409 All-Purpose Cleaner. It can be used on most surfaces and it’s safe for both humans and pets. This cleaner also does not contain ammonia or bleach.
Another option is to use a steam carpet cleaner. If you have a good one, it can clean the fabric without using any chemicals. You can choose to add an upholstery cleaner solution to the warm water, but it’s usually not necessary.
Spot Cleaning Stubborn Stains on Cloth Seats
When I run into stubborn stains on cloth upholstery seats, I usually do some spot cleaning using a cup of warm water and baking soda solution. I apply the cleaning solution to the stain and let the solution sit for a half-hour or so. Don’t let it sit for several hours as it will dry. You can spray a light layer of water to keep it damp while it’s working. Then use a toothbrush or hard bristle brush and scrub gently.
Another note on using a baking soda solution is to keep it in mind for vomit stains. Baking soda works great a neutralizing stomach acid in vomit and makes it easier to remove the stain.
Once you are done scrubbing the stain, spray it with another light layer of clean water to rinse. Then get a dry cloth and blot it to remove excess moisture.
You can also use your steam cleaner to rinse the stained area after you clean it. This is often better since you are cleaning the entire seat and it blends the clean area with the rest of the seat.
And if you don’t have a steam cleaner, you can usually rent one from your local home improvement store.
Do I Use Cold Water or Hot Water to Remove Stains?
The answer to this question is both. You should start with cold water to remove any excess dirt or debris from the seat. Then use a damp cloth and warm water or even hot water to apply the cleaning solution. This will help the cleaning solution to work better and it won’t strip the fabric’s coating.
Keep in mind, that there are specific types of stains where you only want to use cold water versus warm or hot water. I’m talking about organic stains, such as blood, vomit, and things like that.
How to Clean Body Fluids Out of Car Seats?
Body fluids in your car are both gross and unhygienic. Of all the problems people have with the concept of cleaning car seats, this is the one they have the most issues with. Because body fluids don’t sound like something that should be easy to clean from anything. Especially with simple household cleaning products. But when it comes down to it, cleaning body fluids from a car interior is the easiest of stain removals because they’re organic stains.
I have listed below the top body fluids that might end up in your car. These can include blood stains, vomit stains, urine stains, feces (poop) stains, and a recent addition to this list – sex stains. As in how to clean sex stains from car seats. This was added because of the number of questions related to removing sex stains. The sex part is fun, but cleaning up stains afterward is not.
How to Clean a Blood Stain
First, let’s quickly talk about how bloodstains fabrics. When your skin is cut, the blood cells break open and release hemoglobin. Hemoglobin is a protein that contains iron and it’s what gives blood its red color. When this protein comes into contact with air, it oxidizes and turns brown.
For this reason, you want to avoid using hot water on a fresh bloodstain. The heat will cause the blood to oxidize and set into the fabric.
Instead, use cold water or even ice water. Apply it to the back of the stain and blot with a clean, white cloth. The cold temperature will cause the blood cells to contract and push the hemoglobin out of the fabric fibers.
Repeat this process until the stain is gone. For really tough bloodstains, see below under “Clean a Stain with Hydrogen Peroxide”.
How to Clean a Vomit Stain
If you have vomit on the seat or floor of your car, you need to get your car clean fast. Use a cloth and soft brush with cold water. Blot the area until the stain is gone. If the stain is dry, dampen the cloth with cold water and add a few drops of mild soap. Work the dish soap into the fabric and then blot with a dry cloth.
Just like with blood, you’ll want to avoid using hot water on a vomit stain. The heat will cause the proteins in the vomit to set and become harder to clean.
Instead, use cold water or ice water. Apply it to the back of the stain and blot with a clean, white cloth. The cold temperature will help to clean and remove the vomit from the fabric.
If the stain is set, you may need to use a laundry detergent or enzymatic cleaner to remove it. You shouldn’t need a specific upholstery detergent, but cleaning car seats with household products isn’t an exact science. You rely on pH levels in the stain and the cleaning solution to determine the proper mix.
How to Clean a Urine Stain
Urine is made up of water, urea, ammonia, and other compounds. When it comes to cleaning, you don’t want to use hot water. The heat will cause the ammonia in the urine to release and set the stain.
Instead, use cold water or ice water. Apply it to the back of the stain and blot with a clean, white cloth. The cold temperature will help to clean and remove the urine from the fabric.
If the stain is set, you may need to use a laundry detergent or enzymatic cleaner to remove it.
If you have fresh blood on your car seat, use a clean white cloth and cold water. Blot the area until the stain is gone. If the stain is dry, dampen the cloth with cold water and add a few drops of dish soap. Work the dish soap into the stained area with a soft brush and then blot with a cloth.
How to Clean a Feces (poop) Stain
If you have a feces (poop) stain on your car seat, you’re going to want to clean it up as soon as possible. The longer it sits, the harder it will be to clean.
Use a microfiber towel or cloth with a soft brush and cold water. Blot the area until the stain is gone. If the stain is dry, dampen the cloth with cold water and add a few drops of mild soap. Work the dish soap into the fabric and then blot with a dry cloth.
How to Clean Sex Stains
This is one of those subjects that is brought up more often than you might think. People like having sex in their cars. Sometimes this results in certain body fluids ending up on car seats. It’s important to remember that using certain types of cleaners can have an opposite reaction and actually set the stain in the fabric.
For example, semen is protein-based, similar to blood. So you don’t want to use a chlorine-based cleaner. You want to start with cold water, similar to bloodstains. Then move to hydrogen peroxide.
Another question that we get often is how to get sex lube stains out of a car interior. With sex lube, you need to look at the bottle and determine which type it is, water, oil, or silicone-based. Each of these has a different method for cleaning.
Water-based means you can wash it like you do your regular laundry. Use some laundry detergent in a cup of warm water. Apply it and scrub gently with a soft brush. Then rinse it with clean, warm water.
If the sex lube is oil-based, you need to use warm water and a degreaser or fabric cleaner like Oxyclean. Mix up a small batch in a cup with warm water and apply it to the stain.
Silicone-based sex lube is another one that will do fine with Oxyclean. It really all depends on what created the stains. That’s 90% of the battle in cleaning sex stains.
How to Clean an Ink Stain
If you’re dealing with an ink stain, use rubbing alcohol. Dab a clean white cloth in the rubbing alcohol and then blot the stain. You may need to do this several times to remove the entire stain. Once the stain is gone, clean the area with a mild soap and water solution.
If you’re working with fabric seats, you can also try using hairspray to remove ink stains. Just spray the hairspray directly on the stain and then blot with a cloth. Again, you may need to repeat this process several times to remove the entire stain.
How to Wipe Down a Cloth Car Seat
Wiping down the surface of your car seats will help clean them, but using either an upholstery cleaner or simply using warm water is going to help clean without damaging the upholstery.
How to Clean a Car Seat with White Vinegar
You can use a specific upholstery detergent, but I prefer to make my own with a vinegar mixture that includes ½ cup of white vinegar and about a gallon of warm water (you can also add a few drops of mild liquid dish soap to this solution).
This vinegar mixture is a very effective and mild way to clean a cloth car seat without damage to the fabric.
How to Clean Cloth Car Seats with Rubbing Alcohol
This is a great cleaning option because it doesn’t contain any oils and is less likely to cause staining. Mix together the alcohol, a cup of warm water, and laundry detergent or mild dish soap in a spray bottle (a few drops is enough). Then you lightly spray the solution onto the cloth seats. You can let it sit for a few minutes to help loosen any dirt or grime, and then wipe it clean with a wet or lightly damp microfiber cloth.
How to Clean Cloth Car Seats with Hydrogen Peroxide
Most people know Hydrogen Peroxide for its household medical uses. When you got a scrape or cut as a kid, Mom would always grab the hydrogen peroxide in the brown bottle and use it to clean out the wound. But it also does a fantastic job cleaning fabric and upholstery in your car’s interior.
This can be used in place of alcohol (rubbing) because it also contains no oils. It is a great cleaning choice for car upholstery. Mix together 3% hydrogen peroxide, warm water, and laundry detergent or mild dish soap in a spray bottle. Apply it to the cloth car seats in the same way as you would with the rubbing alcohol solution.
Hydrogen Peroxide Cleans Blood Stains
If cold water doesn’t work as well as you want on an organic stain like blood or vomit, you next level to clean the stain with hydrogen peroxide. It’s the brown bottle that you have in your bathroom for cleaning scrapes and cuts.
If you have a light-colored upholstery or leather seat, you can clean it with hydrogen peroxide. You should always test a small, hidden area of the seat first to make sure the peroxide doesn’t damage or discolor the fabric.
To clean a stain with hydrogen peroxide:
Mix one part hydrogen peroxide with two parts water.
Dip a cloth into the solution and blot the stain.
Rinse the area with clean water and let it air dry.
Repeat as necessary.
How to Clean a Cloth Car Seats with Baking Soda
Baking Soda is an amazing product with so many uses. No discussion about cleaning cloth car seats would be complete without at least mentioning baking soda. This is a gentle abrasive that can help clean stubborn dirt or food particles from a car seat without damaging the fabric. Simply sprinkle some baking soda over the seats and then use a slightly wet soft cloth to clean it up.
Baking soda also tends to play well with other types of cleaners. Although I would caution you to be careful when mixing chemicals if you don’t know what you are doing. Different cleaners can cancel out others based on their pH. For example, baking soda is a base and vinegar is an acid, so when mixed together they create carbon dioxide gas and water. That won’t help much for cleaning.
Mix together a hydrogen peroxide baking soda solution to clean your upholstery without damage. For every cup of hydrogen peroxide, mix in 1 tablespoon of baking soda. Apply this baking soda solution to the cloth seats. After letting the solution sit for about 15 minutes, wipe it clean with a slightly dampened cloth.
This solution also works with cleaning car upholstery, coffee stains, and bloodstains, and your car will smell fresh after use.
If you need something stronger for a clean car, you can go the route of laundry detergent in a cup of warm water.
How to Clean Your Car Seats with Hair Shampoo
You can also use hair shampoo to clean car seats and car upholstery. This one might surprise some people.
It makes sense though if you look at the ingredients on your shampoo bottle. If you have a shampoo that doesn’t contain any oils and is meant for use on carpets or furniture, it can work great to clean a car seat.
Mix together 1 cup of shampoo and about a gallon of water in a bucket. Dip a clean towel or cloth into the mixture and be careful to remove excess moisture by wringing it out so it’s not dripping wet. Rub the cloth over the car seat and then let it sit for a few minutes so that the shampoo can loosen any dirt or grime. Rinse the seat with clean water and then pat it dry with a clean towel.
Obviously, we’ve covered a lot of information here. Learning how to clean car seats with household products isn’t an easy one-two and you’re done type of process. It’s also not mess-free. Especially if you want to do it right. If you want mess-free, then find a simple cleaner in a bottle to use. And hope that it works. Or drop it off at your local detail shop.
Let’s talk for a minute about other ideas you might have heard about, like using lemon juice and club soda to clean seats.
How to Clean a Car Seat with Lemon Juice?
There are a few ways to clean seats with lemon juice. One is to mix the lemon juice with water and spray it on the seats. Another is to make a paste of lemon juice and baking soda and apply it to the stain. Leave it on for about 30 minutes before scrubbing it clean and rinsing it with clean water.
How to Clean a Car Seat with Club Soda
Club soda can be used to clean car seats in a few different ways as well. One is to spray the club soda directly on the stain and then scrub it with a clean cloth. Another is to mix club soda with salt to make a paste and apply it to the stain. Leave it on for about 30 minutes before scrubbing it clean and rinsing it with clean water.
How to Clean a Car Seat with Nail Polish Remover
Believe it or not, nail polish remover can also be used to clean car seats. But it’s not a method that I would personally recommend.
To clean with nail polish remover, dab it with cotton balls directly on the stain and then scrub it with a clean cloth. Rinse the seat with clean water and pat it dry. Be careful not to use too much nail polish remover as it can damage the seat material.
How to Clean Leather Seats
Step in the way-back-machine to the 1920s and every car had leather seats. It was the only option available for cars at the time. Cloth seats were considered a very high-end luxury item.
From the 1920s to the 1970s, limousines would often include durable leather up front for the driver, while the passengers in the back enjoyed a soft mohair-like cloth interior.
Today, leather is synonymous with luxury. Many high-end vehicles include it as standard and most mid-level cars offer it as an option. This started when Kia added Nappa leather trim as an option to their Premium XL packages in 2012. Before that, it was only available on luxury vehicles.
Highlights of leather seating include:
A natural look and feel
Low maintenance
Resistant to staining and fading
Easy to clean
The disadvantage of leather is that it can be sensitive to certain types of upholstery cleaner, leather cleaner, and leather conditioner. When cleaning leather seats, it’s important to use a product specifically designed for leather. Look for a cleaner or conditioner that has the words “leather” or “vinyl” in the title.
If you do attempt to clean leather seats with household products, never use products that contain ammonia, alcohol, vinegar, or bleach. These chemicals can damage the leather and cause it to crack.
There are two ways to clean leather seats: with a commercial cleaner or with household ingredients.
Commercial Cleaner: If you choose to clean your leather seats with a commercial cleaner, be sure to test it in an inconspicuous place before using it on the entire seat. Once you have determined that the cleaner will not damage the leather, follow the manufacturer’s instructions.
Household Ingredients: If you prefer to clean your leather seats with household ingredients, mix one-part white vinegar with two parts water in a bowl. Apply the mixture to the seat with a cloth and scrub gently. Wipe the seat clean with a second cloth dampened with plain water. Allow the seat to air dry. Be watchful for dirty solution drips as these will show after the seat dries.
Another option for cleaning leather is to start by wiping down the seats with a microfiber cloth that is slightly damp (not wet) to remove any dirt or debris. Then, make a paste out of equal parts white vinegar and cream of tartar. Rub the paste into the stain and let it sit for about 30 minutes before wiping clean. You can also try using a mixture of equal parts baking soda and water to clean the leather.
How to Clean Vinyl Car Seats
Vinyl car seats can be cleaned with a variety of household cleaners. But you want to be careful which one you use as some can damage the vinyl.
One option is to clean the seats with dish soap and water. Mix together 1 teaspoon of dish soap with 1 cup of warm water in a bowl. Apply the mixture to the seat with a clean cloth and scrub the stain. Rinse the seat with clean water and pat it dry.
You can also use a vinegar and water solution to clean vinyl car seats. Mix together 1 cup of white vinegar and 1 cup of warm water in a bowl. Apply the mixture to the seat with a cloth or microfiber towel and scrub the stain. Rinse the seat with clean water and pat it dry.
If you have a tougher stain, you can make a paste of baking soda and water and apply it to the stain. Leave it on for about 30 minutes before scrubbing clean and rinsing with clean water.
Learning how to clean car seats with household products? Then you need to keep alternative odor eliminators in mind, like ozone machines. Photo Credit: Adobe Stock
Try Ozone Odor Elimination if You Still Have Issues with Odors
It would be remiss of me to end an article about how to clean your car seats with household products and fail to mention ozone odor removal systems. This is the next step type of treatment that will permeate your vehicle with ozone gas and eliminate odors and smells through the power of science and technology. Ozone works and if you have a tough odor that you can’t quite get rid of, you should consider reading the extensive article I wrote on odor elimination using ozone machines.
Go Clean Your Seats
The good news is now you know how to clean car seats with household products that you can find around your house. Sure, it might take a little elbow grease (and maybe some vinegar, baking soda, or hydrogen peroxide), but in the end, you’ll have clean, fresh-smelling car seats – without spending a fortune at a detail shop or car wash. So, what are you waiting for? Grab your supplies and get started! And please let me know which methods you plan on using and which household products you are considering using to clean your car seats?
First, thanks for visiting AutoDetailGuide.com. I want to mention here that this website is a labor of love. This isn’t something that was thrown together by some teenagers that washed a few cars and decided that they were experts at auto detailing. I designed the site to include information that wasn’t available anywhere else when I was starting my own auto detailing business. After 20 years in the detailing industry, I’ve learned many things that I wished I knew back when I started.
It All Started with One Guy
I started as a single proprietor detail shop, so in the beginning, it was just me detailing cars. I had a great time, but it was hard work. As I grew my business I added employees and a ton of new opportunities opened up. I also found a lot of new headaches to deal with as I increased expenses and the stress of dealing with employees. I made a lot of mistakes, but I learned from each one and it helped me to be a better employer and business owner.
Expanding the Team
My business was growing so fast that it was hard to keep up with the growth. Over time my team grew to keep up with all the new business. There were times when it seemed like I was just adding services to make enough money to pay for the added equipment and employees. That’s when I learned how to cut expenses while making sure I took care of myself and my team. Eventually, I added dozens of full-time detailers and teams handling mobile service rigs, industrial pressure washing, boat detailing, and specialty cleaning services.
If You Want Respect Be a Professional
Every business has barriers to entry. This is the cost of starting any business. Unfortunately, an auto detailing business has a low barrier to entry for some people. They look at the business and think, “well heck, I can wash cars, I’ll start a detailing business out of my house garage.” Never mind that a great professional detailer spends years perfecting their art. I used to tell people it took a lot of years cleaning a lot of dirty cars to make this look easy. Everything looks easy until you try to do it yourself.
If you want to be respected in your field of expertise, then be a professional in every aspect of all that you do.
This means you should not only be and act professional but also look great in company uniforms, branded website domains, and everything else involved in developing your business and making it easy to remember.
Auto Detail Businesses Need Insurance
Every auto detail business needs contractor liability insurance. If you aren’t properly insured, that $80,000 car in your garage that caught fire will wipe out everything you and your family love.
Even small accidents can cost serious money. Try getting water in the engine of a brand new Mercedes and then tell me how having contractor’s liability insurance coverage isn’t important.
Insurance is important and you need to talk to your local insurance agent about what types you need for your business. Obviously a commercial business coverage policy with general liability coverage. But you probably also need a contractor’s liability policy, unless it’s built in the commercial business coverage you have. And you might need Garage Keepers Liability Insurance if you keep cars inside your building, or move them anywhere. Basically anytime you have care, custody, and control of customer vehicles is when you need good Garage Keepers coverage.
You also need to talk about workers’ compensation coverage if you have employees.
Become an Expert in Your Field
One of the things I got really good at coming up with systems and processes for everything that we did in the shop and the business. I learned how to build a solid business through processes and systems used by companies many times my size. That’s how I was able to sell my detailing business for such a premium after 20 years of building it.
You want to have everything running smoothly so systems and processes are how you do that. But you also want to become an expert in your field.
Become Known for Paint Overspray Removal
My shop got great at paint services. We were able to remove paint overspray quickly and we got really good at it. We also fixed scratches and got really good at bumper scuff and scratch repair along with paint chip repair. But the thing we were known for was paint overspray removal. I don’t care if you had industrial epoxy overspray covering your vehicle’s clear coat, we got it off and made it look perfect. Using clay bars, high-speed orbital buffers, cutting compounds, nano-ceramic polishes, and a lot of elbow grease and sweat, we became highly sought-after experts in paint overspray removal.
Design the Business to Run Without You
If you design the business to run without you, then it doesn’t matter if you are there or not. This isn’t just important when you decide to sell the business. It’s a big deal if you want to take a vacation with your family or leave early for your kid’s soccer game. Without the processes and systems in place to run the business, you are the only thing that keeps everything together. Are you able to take a vacation without shutting your business down? How many customers do you lose during the week or even a few days that you shut down to spend time with your family? That’s not a good way to run anything.
Stay Involved in the Industry
I have built a ton of relationships with suppliers, detailers, and industry leaders over the past two decades. I write about many of those on the site or in my detailers blog. I included pages on auto detailing equipment, auto detailing supplies, important business insurance, training, organization systems, and more. The only way you build relationships is to stay involved in the industry. Even after selling my detailing shops and mobile rigs to a larger company, I kept my relationships so I could continue helping other detail shop operators in their own businesses.
Detailing Techniques That Work For Amateurs
What if you aren’t interested in starting your own auto detailing business? No problem. Instead of having you pick up a high-speed buffer, we’ll go another route. Over the past decade, I have developed some great alternatives to many of the “old school” auto detail training methods that detail pros use to make cars shine. Essentially I’ve developed techniques that work for amateurs and professionals alike. When I was creating ideas and thinking about Auto Detailing Guide themes, I also wanted it to be a place where you could just stop by and get some great tips on detailing your car at home. Check out our Home Auto Detailing Guide Tips and Techniques page and pick up some great new ways to clean faster and better than what you are probably doing now.
Auto Detailing is a Rewarding Business
So thanks again for stopping by and checking out AutoDetailGuide.com. My hope is that you walk away from our site having learned new ways to do things that will increase your profits or efficiency. If you have questions on anything that we haven’t added to the site yet, feel free to send us an email at feedback@autodetailguide.com and we will help out however we can.
We are always adding new areas and information, so please stop back. If you want to get notified when we update the site, consider subscribing to our opt-in-only email newsletter. You can also find us on Twitter and Facebook.
What is Paint Overspray? It’s created by people like this. Professional painters spraying the underside of a bridge. PHOTO CREDITS: AdobeStock – Elroi
What is Paint Overspray?
I started this article with the idea of writing about paint overspray on cars and how to remove it.
Then it occurred to me that some car owners with this problem might want to know more details about paint overspray and how to deal with it beyond being told to get a buffer and a clay bar and go to work.
Sometimes you simply want to find the person that covered your car in hardened spray paint droplets and have them take responsibility. Most of the time it’s just an accident or mistake on their part and it’s the reason they have liability insurance coverage.
You also have insurance for a reason. And paint overspray removal is a very common issue that insurance companies frequently deal with. So much, in fact, that many insurance carriers have national contracts with paint overspray removal services and/or auto detailing shops for clay bar and buffing services.
Since this is AutoDetailGuide, we like to cover all aspects of an automotive topic. Like we’ve been doing since 1999. This article is generally the first step in starting the paint overspray removal process.
So let’s talk about how to remove overspray. From the basics like what it is and where it comes from, to the advanced topics of how to file an insurance claim to remove paint overspray, and how to make sure you aren’t out of pocket for the repair costs.
What is Overspray?
The word “overspray” refers to the phenomenon of droplets of paint or similar related coatings that are dispersed through the air but do not adhere to the surface it was supposed to cover. This is where the “over-spraying” aspect comes from.
Overspray is a surprisingly common occurrence in many industries, including automotive manufacturing, construction, and, of course, painting.
What is Paint Overspray?
Spray paint overspray is what happens when paint is sprayed through a pressurized or airless sprayer and lands on a surface other than the one it was intended to cover. The most common example is latex paint or polyurethane sealers that are carried by the wind and land on something other than the intended surface. On windy days paint overspray is a serious problem. It could land on a car, truck, house, boat, or any number of objects.
What is the most common type of overspray?
The most common type of overspray is sprayed paint. Most often this is latex paint, but there are many others including epoxy deck stains, industrial epoxy coatings, and heated highway line paint.
Where Does Paint Overspray Come From?
There are many different types of overspray and they are usually named by the source of the coating in question. The most common examples of this are:
Highway line painting
Bridge painting projects
Construction painting
Residential home exterior painting
Cleaning wooden decks and applying polyurethane sealers
Each type of paint has a different chemical makeup and will require different removal methods.
Epoxy paint like those used in commercial paint jobs, bridge painting projects, painting water towers, and large office building painting, is some of the most difficult paint to remove. Anyone who has ever sprayed paint on anything will understand how fast paint spray travels. This is why you see the huge white tarp wrapped bridges for overspray prevention when you’re driving on the highway.
A painting contractor knows how difficult it is to remove industrial epoxy coatings from a painted surface. Applying paint that doesn’t come off is their job. It’s also their responsibility to prevent overspray to mitigate or reduce potential damage claims that are caused by their performance.
The surface that the paint is on will also play a role in what removal methods will work and also affects overspray removal prices.
For example, bridge painting projects use epoxy paint that is heated to high temperatures and then applied with spray guns onto the surface. Painters use many methods to prevent overspray, but sometimes it still escapes. Large commercial paint jobs drift in windy conditions like this. And that type of paint overspray removal is very difficult without damaging the underlying surface.
Highway line paint is another difficult type of epoxy paint to remove. It is also heated to high temperatures and then applied hot to the surface with spray guns. Highway road paint is designed to withstand harsh conditions, including weathering, UV rays, and road salt. The road paint workers do attempt to prevent overspray, but they have to use large spray patterns to get enough paint on the road.
If you’ve ever tried to attempt road paint removal from your car’s inner wheel wells, then you know how it’s difficult removing overspray like that.
So it stands to reason that removing it from your car is equally difficult. That’s why an auto insurance company will have insurance claims experts that deal with these types of claims.
What Causes Paint Overspray?
Overspray happens while painting anything. It can be caused by many things, from faulty spray painting equipment to weather conditions and carelessness on the part of the painter. And while it is more commonly associated with damaging car paint jobs, it can happen anytime a painter is working with paint.
There are a few factors that can contribute to overspray. The most common one is the use of an improper spray gun or nozzle. If the atomization of the paint is not correct, it can result in large droplets that spread out too much as they travel through the air.
Bad weather conditions can also cause the paint to dry too quickly or blow away in unintended directions when it’s windy.
Another common cause is not having proper containment around the work area. This could be something as simple as not tarping off a vehicle before painting it. If there is nothing to contain the paint, it will spread out and eventually land on something else.
How Far Does Paint Overspray Travel?
Paint overspray is carried away from the spray gun by the wind and can travel for miles. This is what causes it to land on cars, trucks, houses, and other surfaces that are not its intended target. The farther away from the source, the spray pattern, and the number of spray guns applying paint, the more widespread the damage will be.
This is why contractors are forced to pay so much for their liability insurance coverage. And why most go out of their way to prevent overspray from happening at all. A small accident can cover an entire vehicle, or just the windshield and plastic trim.
But a large claim can be tens of thousands of dollars or more.
How Does Paint Overspray Get on Cars?
There are many ways that paint overspray can get on cars. When paint or sealant is applied to a surface with a spray gun from an airless paint sprayer, some of it will inevitably fly off and land on other surfaces nearby. It turns into a fine mist of paint particles, so it is bound to travel some distance.
Common ways to get paint overspray on your car:
Driving through an area where a painter is working, even if you are several blocks away
Having your car parked near or under a structure that is being painted
Driving or parking near a construction site where workers are using paints or sealants
Driving or parking near a bridge that is being painted
Driving behind a highway paint truck sprayer
Driving or parking near a house having its porch deck boards painted and/or sealed
What Does Paint Overspray Look Like?
Clearcoat contamination and paint overspray are often missed when you are looking at your car. The problem is the size of the droplets and the color of the paint or sealant. Even black paint overspray on a white surface might look like a light dusting of dirt because it’s such a fine mist when it settles on your car.
The easiest method of identifying overspray is not through sight, it’s by touch. Run your hand over the car and feel the paint. Your normal car clear coat is perfectly smooth. But overspray feels bumpy, like sandpaper. If you feel something less than smooth, it’s a good indicator that you have paint overspray on your car.
Who is Responsible for Overspray?
Paint overspray damage is usually caused by painting contractors, auto body shops, bridge painters, construction companies, and so on. There are many types of businesses and contractors that paint.
And reputable businesses all have insurance. It protects both them and their customers.
Most contractor insurance policies include paint overspray coverage. This is because it is a common occurrence and can cause significant damage. The policy will cover any damages caused by the paint overspray, including:
Paint that has been deposited on the surface of the car
Paint that has been deposited on the windows or windshield
Paint that has been deposited on the paint job itself
Industrial bridge painters and construction companies pay a lot of money in liability insurance coverage to pay claims resulting from paint overspray damage.
So do painting contractors.
And when your neighbor admits he used a paint sprayer indoors but swears he left the windows closed? He has homeowners insurance just for that reason.
How to Verify Contractor Liability Insurance is Active
At a minimum, you should have proof of coverage or a certificate of insurance for your contractor’s liability insurance. This certificate allows you to see exactly what type of liability coverage the contractor maintains. And also verify that the policy is active and in force (paid and up to date).
You should also be listed as an additional named insured so it is easier for you to file a claim and verify coverage. Any contractor that has a problem with this part of the hiring process, should simply be avoided.
Does Contractor Liability Insurance Exclude Overspray Claims?
Short answer, no. Long answer, possibly. It really comes down to the contractor and which options they choose for their commercial insurance coverage.
All reputable contractors have liability insurance that is initially offered with overspray claims coverage included. If you’re concerned about the possibility of overspray damage, ask your contractor what kind of liability insurance coverage they have in place before you hire them.
Where you run into problems with this is with a professional painter that is trying to save money on their liability insurance costs. Many insurance companies now offer the option to exclude overspray coverage from their professional liability insurance policies. The cost savings can be significant, so this is an important question to ask your painter.
Keep in mind that any professional painter can still cover your neighborhood in overspray even if they don’t have overspray coverage. If that happens and your neighbors want their homes repainted or glass windows replaced, your homeowner’s insurance might be the only protection you have. You can always sue your painter, but if they couldn’t afford full liability coverage, there’s a good chance they won’t have anything to recover in a lawsuit.
If you switch roles and you need to remove paint overspray from the body paint on your car because of a contractor that painted your neighbor’s house, your homeowner’s insurance will likely cover the cost of repairs. But before you go that route, talk to your neighbor and ask if they got a copy of their contractor’s liability insurance information. Otherwise, you will most likely be stuck paying the deductible on your homeowner’s insurance policy.
No matter what the source, it’s important to have the overspray removed as soon as possible. The longer it sits, the harder it will be to remove.
If you think your car has been hit with overspray, take photos and contact your insurance company right away. They’ll work with a professional to get the paint removed quickly and efficiently.
Or take it to your local auto detailing shop and ask about clay bar services. They can usually get your paint back to normal in a day.
Will My Auto Insurance Cover Paint Overspray Damage?
Most instances of paint overspray removal are covered by auto insurance, regardless of who is at fault. The problem is with deductibles. The average deductible in the United States is $500. And overspray removal prices average roughly $500 for a mid-sized vehicle. So it’s worth it to find out who did the painting and attempt to get them to pay for it. Or give the information to your insurance agent or claims adjuster so they can go after the person who created the mess.
What Should I Do When I Find Paint Overspray on My Car?
In most cases, paint overspray is not a serious problem. It’s just a nuisance that can be easily removed with a little elbow grease and some cleaning supplies. However, in some instances, paint overspray can cause serious damage. For example, if it gets into the engine of a car, it can cause costly repairs.
And depending on the condition of your paint, you could be looking at a new paint job if the damage is extensive.
How Do I Identify the Type of Paint Overspray on My Car?
If you find paint overspray on your car, the first thing you should do is identify what type of paint it is. Once you know what type of paint it is, you can research the best way to remove it.
How do you identify the type of paint? Do some detective work.
If you have yellow highway paint on the wheel wells of your car, you probably drove behind a highway painting truck.
If you see tarps hanging from a bridge near your office and you have the same color paint as the bridge, you probably have overspray from the bridge contractors.
Is your neighbor boasting about his nice, shiny, newly cleaned, and sealed deck? And your car is covered in clear overspray bumps? Then you got hit with polyurethane deck sealant overspray.
In many cases, a simple soap and water solution will work to remove light or medium overspray from cars if you catch it quickly. However, if the overspray is more difficult to remove, you may need a stronger solution or specialized overspray removal products.
Removing paint overspray can be a challenging and time-consuming task. But it’s important to take the time to do it right so that you don’t damage your car or cause further damage by using the wrong removal method.
Should I Consult a Professional Detailer or Body Shop to Remove Overspray?
If you’re not sure what type of paint overspray you have, or if you’re unsure of the best removal method, it’s always best to consult a professional. A professional detailer or body shop will be able to identify the type of paint and recommend the best way to remove it. They will also have the proper tools and products to get the job done right.
If you find yourself dealing with paint overspray, the best course of action is to remove it as soon as possible. The longer you wait, the harder it will be to remove.
If you’re ever faced with dealing with paint overspray, don’t panic. In most cases, it’s not a serious problem and can be easily resolved. And if you do experience any damage, don’t hesitate to file a claim with your insurance company. They’ll be more than happy to help.
Ice covering a car in winter. Freeze and thaw from ice mixed with salt damages car paint. Photo Credit: Adobe Stock
How to Protect Car Clear Coat in Winter
Winter weather is upon us. Anybody who lives in the northern half of the United States is well acquainted with the many environmental factors that will damage car exteriors.
In this article, we will cover the types of environmental contaminants that are constantly attacking your car, namely acid rain, road salt, and extreme winter weather conditions. And then we give you the knowledge and show you how to use the tools necessary to protect your car clear in the winter weather.
What is Acid Rain?
Acid rain is a form of precipitation that is more acidic than normal rain. The main component of acid rain is sulfuric acid, which forms when coal or oil is burned. Acid rain can also contain nitric acid and other harmful chemicals.
Industrial pollution is a contributor to forming acid rain which damages car clearcoat. Photo Credit: Adobe Stock
What Causes Acid Rain?
Acid rain is caused by industrial pollution and vehicle exhaust, which releases sulfur dioxide and nitrogen oxide into the atmosphere. These gases react with water vapor in the air to form acids.
How Does Acid Rain Affect Cars?
Acid rain can corrode metal surfaces, which is essentially an entire car. It can also cause rubber and plastic parts to deteriorate
How Does Acid Rain Damage Car Paint?
Acid rain can cause serious damage to a car. The acid in the rain strips away the protective wax and polish on a car, leaving the paint vulnerable to corrosion.
How to Protect a Car from Acid Rain?
There are several things you can do:
GOOD – Apply Wax to your car regularly. A good coat of wax will provide a barrier between the acid rain and your paint.
BETTER – Frequent car washes are great for cars. A good car wash will clean off acid rain and also help remove other corrosive substances like dirt, grime, or salt that has accumulated on your paint.
BEST – Apply nano ceramic polymer coatings. This will create an extra layer of protection for your paint. These coatings form an invisible barrier that repels water and dirt.
What is Road Salt?
In the Northern cold states, road salt is used to de-ice roads in the winter. The most common road salt is sodium chloride, which is a compound made up of sodium and chlorine. The big salt trucks usually have the sodium chloride version of road salt to make the roadways safer. In the extremely cold areas of the US, they use other variations including potassium chloride and magnesium chloride.
How Does Road Salt Damage a Car?
The main problem with road salt is that it creates a corrosive environment. Salt and water create a brine solution that can corrode metal surfaces. When this solution comes into contact with painted surfaces on your car, it can cause the outer clear coating to break down, delaminate, and peel off. The problem is compounded in winter because there are more vehicles on the road kicking up salt, and the temperature difference between the air and pavement creates a moisture-rich environment that speeds up corrosion.
How Do I Protect My Car from Road Salt?
The easiest way to protect clear coat from road salt is to simply wash it during the winter. A good car wash will remove the most corrosive elements from a car exterior. It sounds simple but it’s true.
Many people don’t bother with this because they need to run it through a car wash unless they have a heated garage in their house.
I’m in Pittsburgh and our winters are brutal. If you don’t have a heated garage, there’s the added problem of frozen doors and door locks the next morning after we wash our cars. It just gets so cold so fast that the door jambs and locks don’t have time to dry before they ice up after a car wash.
One of the best ways to protect your car from road salt is regular car washes. Photo Credit: Adobe Stock
Another very effective way to protect your car from road salt is to apply wax. This forms a protective barrier between the paint and the environment. Wax also tends to be a catch-all phrase for any type of protective coating or sealant that you apply to your car paint. So let’s briefly expand on this.
What is a Polymer Sealant?
A polymer sealant is a clear coating that is applied to the car’s paint. The polymer sealant bonds with the paint and creates a barrier between the environment and the paint. This type of sealant will last for several months but will need to be reapplied after each wash.
What is a Nano Coating?
A nano coating is a type of sealant that uses nanotechnology. Nanotechnology is the science of creating materials and devices at the atomic and molecular levels. In this case, nanoparticles are used to create a protective barrier on the car’s paint. The nanoparticles are so small that they form an invisible barrier on the car.
What is a Ceramic Coating?
Ceramic coatings are liquid polymers that bond to the car’s paint and become a durable, clear layer of protection. It can last for several years and is applied by a professional.
These types of coatings are basically upgraded polymer sealants. It’s a newer technology created by blending a polymer sealant with a nanoparticle or nanomaterial that makes it stronger and more versatile.
For example, scientists have combined graphene into a polymer sealant that provided incredible anti-corrosive properties. This is the basis for nano-ceramic polymer coatings.
Can I Apply a Ceramic Coating Myself?
Yes, but we don’t recommend it. The process is very technical and requires a lot of experience to do it correctly. If you don’t have the experience, we suggest finding a professional who can apply the coating for you.
Polymer coatings and sealants will help protect car clear coats for long periods of time. Photo Credit: Adobe Stock
How Do I Apply a Ceramic Polymer Coating to a Car?
Nano-Ceramic Polymer Coatings are applied in a similar way to polymer sealants, but the process is usually done by a professional. The coating is applied in very thin layers and needs to be cured under UV light or infrared light.
What are the Benefits of Ceramic Coatings?
Ceramic polymer coatings provide an extra layer of protection for your paint. They form an invisible barrier that repels water and dirt. Ceramic polymer coatings also make it easier to wash your car because the dirt and grime will not bond as strongly to the paint.
These types of nano-enhanced polymer sealants and coatings can also last for several years with proper care. This is much longer than a standard polymer sealant.
This type of coating is applied to the paint and creates an invisible hydrophobic barrier, which is highly effective at repelling water, dirt, and road salt making it easier to wash your car, whether it’s at home or at a car wash. Ceramic polymer coatings can last for several years, but they are more expensive than polymer sealants.
How Do Ceramic Coatings Protect Cars?
Car waxes, polymer sealants, nano-ceramic polymer coatings are fantastic ways to protect your car’s paint and increase scratch resistance. Ceramic and nano types of coatings are also an option for cars that are frequently exposed to road salts. These coatings form a thick barrier that protects the paint from corrosion. They are also hydrophobic, meaning they repel water. This is a key feature because it prevents the formation of salt brine on the paint surface.
Another cool aspect of ceramic coatings is snow easily pushes right off the car. So you don’t need to do a lot of work cleaning snow off your vehicle.
Keep in mind that none of this is an excuse to not take your car to a car wash during the winter.
The great thing about this type of car coating is the tiny nanoparticles form an extremely tough barrier on the surface of the paint. And increasing your car’s scratch resistance is always a good thing.
One downside to nano ceramic polymer coatings is they can be expensive. But, if you’re looking for the best protection available, it’s definitely the way to go.
Are Ceramic Coatings Better Than Wax?
There is no question that ceramic coatings are better than wax. One of the main reasons is the hydrophobic barrier that it creates. The thicker barrier protects against corrosion from salt damage and increases scratch resistance much better than wax alone.
The hard coat layer formed by the coating provides some protection from light scratches. It’s similar to paint protection film, but not as durable or long-lasting. It is also resistant to paint color fading from damaging UV rays, repels dry dirt particles, oils, and water through the hydrophobic barrier.
Your car will look great for a longer period of time with this type of paint protection.
Protect Your Car from Road Salt Damage
At the end of the day, it’s up to you which option you choose. But if you’re looking for the best way to protect your car from road salt damage, acidic tannins from wet leaves, rock chips, light scratches from automated car washes, and other winter weather hazards, then a nano coating is the way to go.
You can also protect your car’s paint from road salt with wax or a polymer sealant – both of which are much less expensive options.
So, which is better to protect your car?
Ultimately, the best way to protect your car year-round, but especially in the winter months, is to use a combination of methods.
Paint Protection Film for Cars
Another much more expensive option is to add a car paint protection film to specific parts of your car that experience road salt damage. This includes side rocker panels, front and rear bumper, front hood, etc. These are also the same exterior surface areas that experience damage from rock chips, snow, ice, and UV rays, along with the usual dirt and grime from driving.
The film is a clear urethane or vinyl and installs on the car much like window tinting. It’s usually applied by a professional installer and can last for several years, but does need to be replaced when it starts to show signs of wear.
One downside to this option is that not all parts of the car are protected – just the areas where the film is applied.
Another downside is that it can be expensive to have installed, depending on how much surface area you’re covering.
A final consideration is that some paint protection films for cars can yellow over time from exposure to UV rays. But the sun, while still strong in the cold weather winter season, is nothing compared to the rust spots created by harsh chemicals in road salt being dumped on winter roads by salt trucks. So protection films are better than nothing at all.
Waxing Your Car
Waxing your car is probably the most common method people use to protect their car’s paint. It’s a simple process and can be done at home by following these steps:
– Make sure the surface is clean and dry
– Apply a thin coat of wax using a soft cloth
– Wait for the wax to dry completely (usually takes about 15 minutes)
– Buff the waxed surface with a clean, soft cloth
– Repeat the process if necessary
Waxing your car will protect the paint from UV rays, water, and dirt. It’s also relatively inexpensive and easy to do. However, it doesn’t last nearly as long as some of the other options on this list.
Hand Waxing
Hand waxing is the most common way to protect your car’s clear coat paint finish from the rainy season and acid rain. You can find wax in different degrees of hardness depending on how much protection you want for your vehicle, whether it be just a light coating or an extremely durable one.
PRO TIP: The liquid form of wax will last longer than traditional paste. It’s also much easier to apply. That link is for Chemical Guys Butter Wet Wax, which is by far my favorite liquid hand wax. It goes on easily and smoothly. And your car looks amazing after you’re done.
Tools needed for applying car wax by hand are a microfiber cloth or cheesecloth and an applicator of some sort, like cotton balls, old (but clean) t-shirts, sponges, or even household rubber gloves.
What are Microfiber Towels?
I love microfiber towels so much that I wrote an entire article about what kinds to use, how to wash and care for them, and how to manage your microfiber supply.
And don’t think just because you are using them at home instead of a detailing business that you shouldn’t worry about managing your towel supply. The first time your spouse uses one of your car window cleaning only microfibers to dust furniture with Pledge, you will learn to put your microfibers in their own labeled bin.
Removing Wax Residue
Wax residue is hard, crusty, leftover wax. It happens with waxing by hand or high-speed buffer, so there’s no magic method to getting rid of it other than not using as much wax or protective coating.
You will find wax residue in hard-to-reach areas on vehicles. Like where the car door metal meets the rest of the car. Or door handles and windows. And around headlights or brake lights. It’s a pain in the rear.
There are many ways to remove the wax residue. And most of the methods that actually work are old school.
One such method is simply laying out aluminum foil or a sheet of wax paper on the ground while you work and then scraping off any leftover residue with your fingernail.
What are Plastic Razor Blades?
Plastic razor blades are another very useful tool when waxing a car. The wax residue in hard-to-reach places quickly becomes an ordeal without these cheap, little, plastic pieces. If you don’t have them, definitely buy some. They look like razor blades in shape only. In reality, they are simple pieces of plastic with a fat edge to hold it and a thinner flat edge to scrape.
I use this scraper that I found on Amazon a while back (picture below). It comes with both plastic and metal blades and the top portion extends to get into those hard-to-reach places. And it’s less than $10, so win-win.
A good rule of thumb is to wax your car every few months to keep the paint looking fresh.
Hand Waxing Your Car is Difficult
If you insist on hand waxing your vehicle, just be aware that you are embarking on a very long, arduous, all-around difficult task.
People who do this generally look at it as a relaxing several-hour process. They turn on some music or whatever game is on the TV, and they start working. It’s not something you do in a hurry. Take your time and get it done right.
Before I discovered high-speed buffers, I would spend an entire Sunday afternoon waxing my vehicle.
The application of car wax is the same today as it has always been. Either by hand or with a powered high-speed buffer. These two methods are also known as the hard way and easy way.
The easy way is always better.
There are two types of carnauba wax: natural and synthetic. Synthetic is better because it lasts longer, but both will give your car’s paint a deep shine.
The high-speed buffer will take off the wax much faster than you can by hand. And it will do a better job, too.
It’s not that difficult to use a buffer. Just be careful not to apply too much pressure and go over the same spot too many times in the same place. You don’t want to burn the paint off your car.
The best buffers have a speed control so you can adjust the speed according to the condition of the surface you’re working on.
High Speed Buffing Your Car Clear Coat
So how is high-speed buffing better? Well, mainly because it’s not physically possible to move your hand as fast as a high-speed buffer going a few thousand RPM (revolutions per minute).
A high-speed buffer will remove defects in paint and clear coats like swirls, water spots, and oxidation as well as apply car wax.
The surface of your clear coat is left completely clean after buffing because the machine rotates at speeds up to 2000 rpm in a circular motion over its entire surface.
After doing this for about 20 minutes with different types of buffing pads, your car will look amazing.
How to Avoid Circular Swirls from High-Speed Buffing
What about circular swirls in the clear coat from the high-speed buffer?
These can occur if your skills need improving on the wheel (that’s what pro detailers call the high-speed buffer).
You need to make sure the surface is clean and dry before starting. Second, use a light touch when buffing. And finally, use the appropriate type of buffing pad for the job.
If you are using a high-speed buffer for the first time on your car, there’s an even better way to protect your car’s paint and clear coat.
A High-speed Orbital Buffer is the Best Way to Buff a Car
As the name suggests, an orbital buffer moves in a random orbit around the surface it is polishing instead of rotating in one spot like a high-speed buffer.
This prevents swirls from forming on your car’s clear coat and gives you a smooth finish.
I use a Porter-Cable High-Speed Orbital Buffer that I’ve had for years.
Just like the high-speed buffer, it removes swirls but because of its orbital motion (it rotates in a circle with an ellipse), you can control the buffing by using your hand. But pay attention to paint temperature and use gloves for protection from heat.
Good Car Care is a Great Habit for Car Owners
Car care is a good habit to start any time of the year. Not just the winter months. Keeping your car clean will benefit you in the long run.
My goal in this article was to teach you a few ways to protect your car in the winter season and throughout the year. Car washes might not be the best way to wash your car, but the alternative is to leave it exposed to the elements. And that is much worse.
Wash it regularly with a good car wash soap and dry it completely.
Apply wax every few months or so using good quality wax to protect car paint. Especially in cold weather and winter months.
Use a polymer sealant or professionally installed nano ceramic polymer coating to provide an extra level of protection.
If you live in an area with high levels of road salt, it might be a good idea to consider using all three methods for the ultimate winter paint protection.
No matter which option you choose, remember that prevention is always better than trying to fix road salt damage after the fact.
And, if you can afford it, have a nano-ceramic polymer protective coating applied to your car paint. This will give you the best protection against all the big bads of winter.

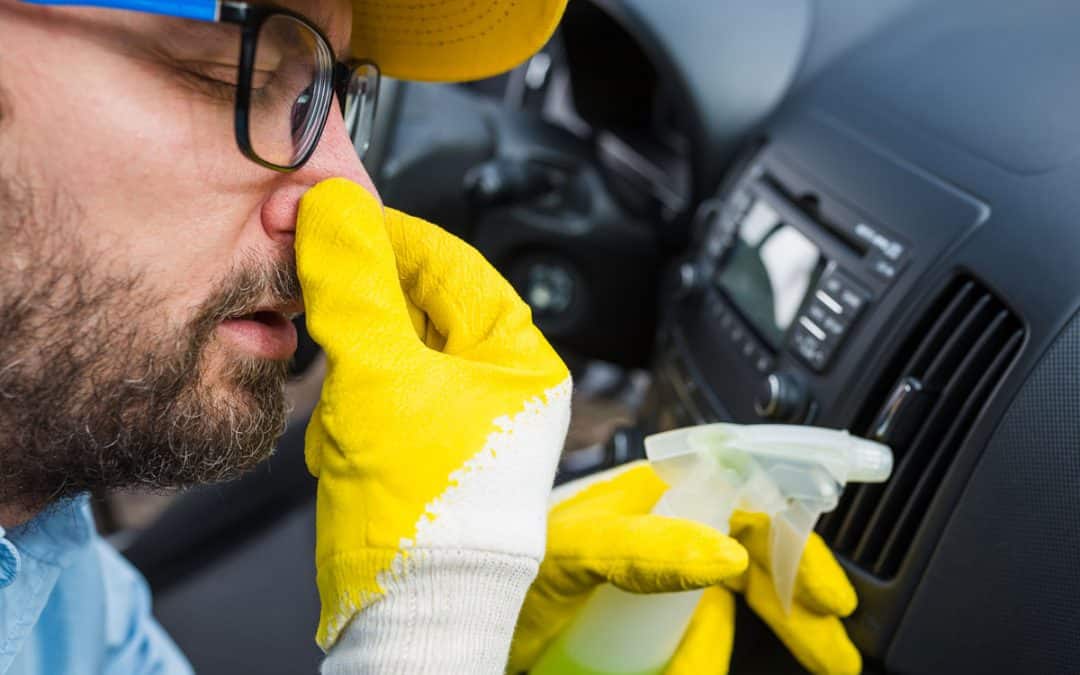


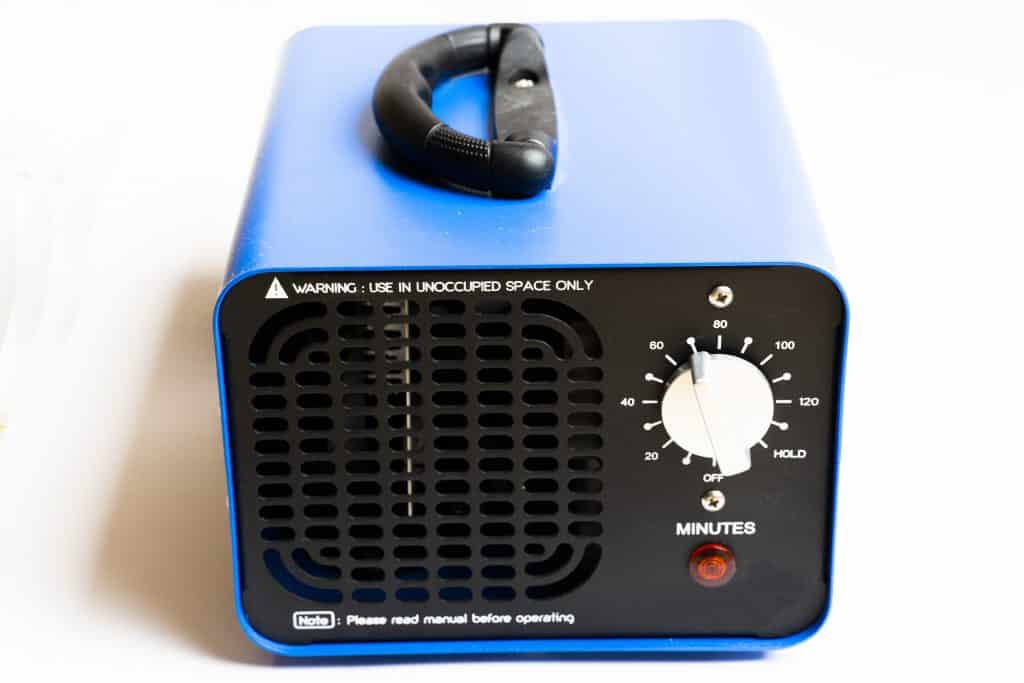
![How to Clean Car Seats with Household Products [2022]](https://autodetailguide.com/wp-content/uploads/2022/06/Steam-Cleaning-Seats-Console-Car-AdobeStock_259402232-opz-1-1080x675.jpg)
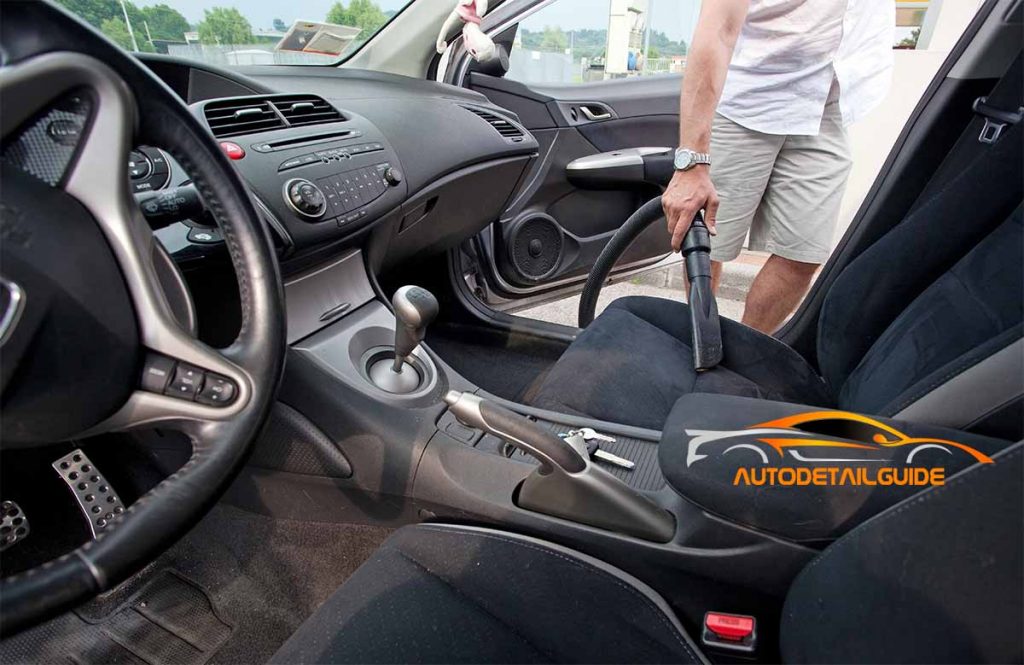
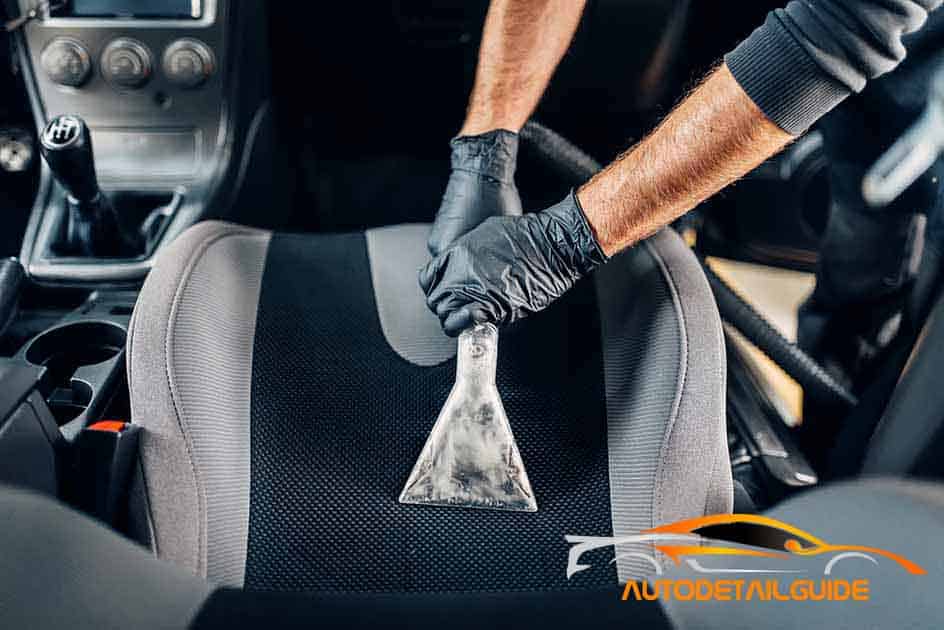
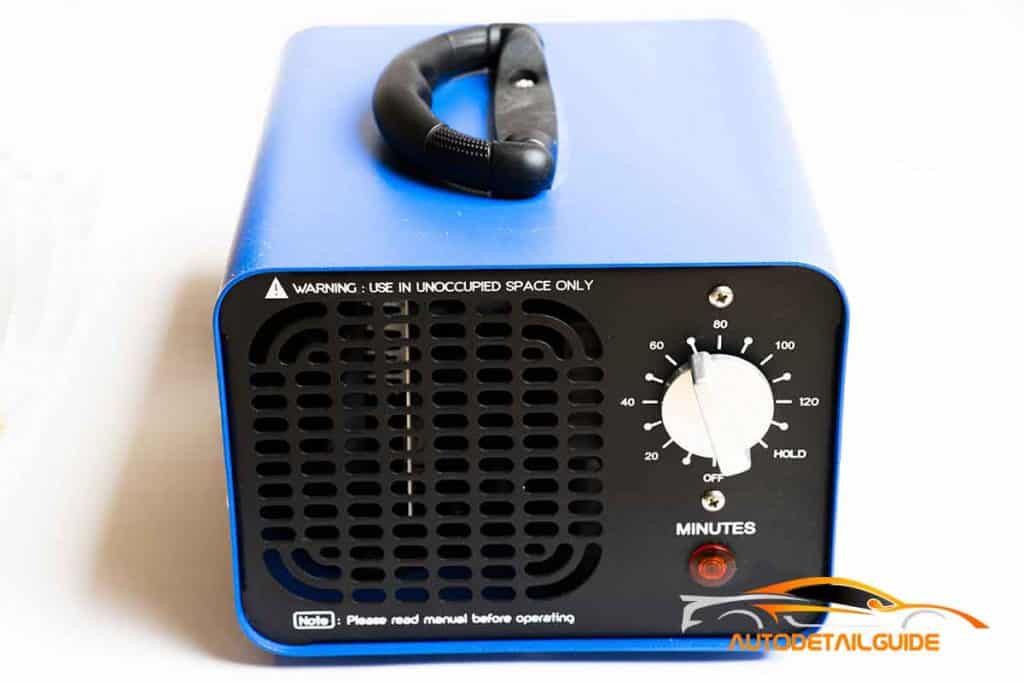

![What is Paint Overspray? [UPDATED 2022]](https://autodetailguide.com/wp-content/uploads/2022/03/Bridge-Painting-with-Spray-Gun-AdobeStock_269956529-opz-1080x675.jpg)

![How to Protect Car Clear Coat in Winter [2022]](https://autodetailguide.com/wp-content/uploads/2022/03/Salt-Truck-AdobeStock_96501817-opz-1080x675.jpg)